
This article is your step-by-step reference for building a tax organizer template in Qount. It covers every action inside the Template Builder — from navigating to templates, to configuring every question type, to setting up display logic and prior-year data pull.
If your firm has built or used any templates in the previous version of Tax Organizers in the new interface, you will need to duplicate those templates to access the new features and continue working on them in the updated version. Templates from the previous version cannot be used for sending organizers or performing any actions — they must be updated to the latest version by duplicating. The duplicated template will include all the latest functionality. Your original template remains unchanged.
Before reading this guide, it helps to understand what the Template Builder is and how the template structure works.
🔗 New to the Template Builder? Start with Tax Organizer Template Builder — Overview for a full orientation before diving into these steps.
Important Any changes made to a template apply immediately to all client organizers built from that template — including those already sent. There is no client-level override. Plan edits carefully during an active filing season.
Quick Links
1. Navigating to Templates
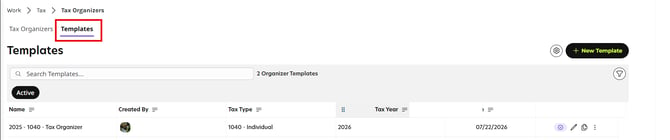
Step 1 Click Work in the main top navigation bar.
Step 2 Select Tax from the Work menu.
Step 3 Click Tax Organizers in the left sidebar.
Step 4 Select the Templates tab at the top of the page.
You will see a list of all existing templates for your firm.
2. Template Actions
The Templates page shows all your firm's templates. By default, it displays active templates. You can search by template name using the search bar, or use the filter to switch between active and archived templates.
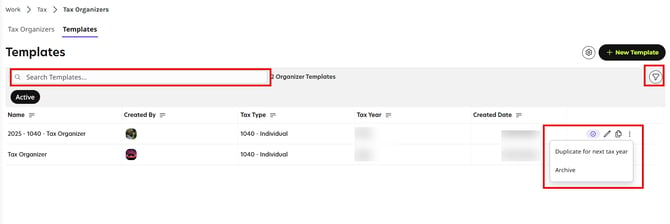
Each row in the Templates list has action icons on the right-hand side. The edit and duplicate icons are visible directly on the row; additional actions are available under the three-dot (⋮) menu.
|
Action |
What It Does |
|---|---|
|
Edit |
Opens an edit dialog to update the template name. |
|
Duplicate |
Creates an exact copy of the template for the same tax year. Useful for creating firm variations. |
|
Archive |
Removes the template from the Active view. Archived templates are not deleted and can be restored. |
|
Duplicate for Next Tax Year |
Copies the template and prepends the new year to the name. Use this at year-end to prepare next season's organizers. |
Note To edit the contents of a template — sections, questions, logic — click directly on the template name to open it. All editing happens inside the template, not from the Templates list.
Tip Use "Duplicate for Next Tax Year" at the start of each filing season. All sections, questions, and logic carry over — just review and adjust for any changes.
3. Creating a New Template
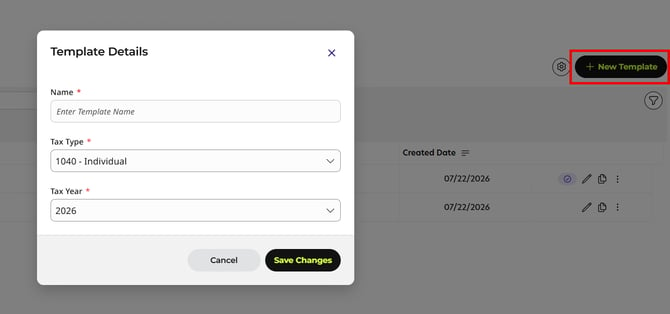
Step 1 Click the + New Template button.
Located in the top-right corner of the Templates screen.
Step 2 Enter a Template Name.
Choose a descriptive name, e.g., "1040 Standard – 2026" or "High Net Worth – 1040."
Step 3 Select the Tax Year from the drop-down.
Step 4 Click Save Changes.
You are automatically taken into the template builder.
Note Tax type is set to 1040 - Individual by default.
Tip We strongly recommend starting with the Qount-provided 1040 - Tax Organizer Template - Default and customizing it rather than building from scratch. The provided template already includes a complete question set, validation rules, display logic, and prior-year mappings — saving significant setup time.
4. Understanding the Template Skeleton
When you first enter a new template, Qount pre-populates four top-level sections as a starting skeleton:
- Personal Information
- Income Sources
- Deductions & Credits
- Additional Info
Personal Information and Income Sources contain pre-built sub-sections. You can add, remove, reorder, or rename custom sections to suit your firm's workflow.
Personal Information — Default Sub-sections
- Taxpayer Information
- Spouse Information
- Dependents
- Contact Information
- Bank Information
- Additional Questions
Income Sources — Default Sub-sections
- Wages
- Bank & Brokerages
- Business — Schedule C
- Rental — Schedule E
- Farm — Schedule F
- Partnership and S-Corps
- Retirement
- Miscellaneous
- Foreign Income
- Crypto & Digital Assets
Tip Sub-sections labeled "Pulls Prior-Year Data" automatically populate client answers from the previous organizer when you send — reducing repetitive data entry for returning clients.
5. Working with Sections
5.1 Adding and Reordering Sections
The left panel is your structural control center. From here you can:
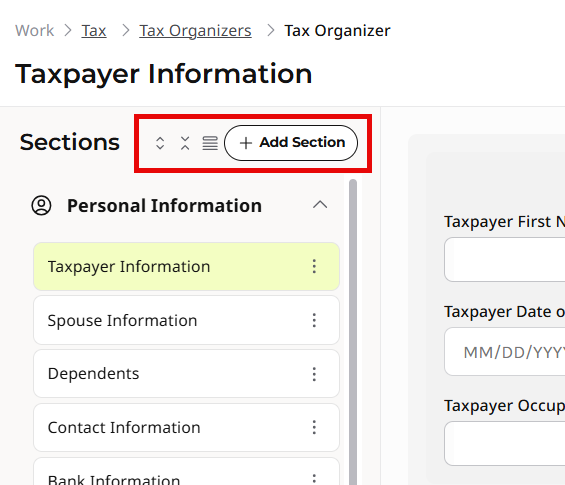
- Add a new top-level section using the + Add icon at the top of the left panel
- Reorder sections by clicking on the reorder icon and dragging them up or down
- Expand or collapse individual sections using the ▼ / ▲ icons next to each section name
To add a new custom section:
Step 1 Click the + Add icon at the top-left of the sections panel.
Step 2 Enter the section name in the modal and click Save.
Note Both Qount-provided default sections and custom sections can be reordered.
5.2 Enabling and Disabling Sections
Each section has a toggle to enable or disable it. Disabled sections are completely hidden from clients and excluded from mandatory question counts.
Hover over the toggle to see its current state:
- "Disable section" — shown when the section is currently enabled
- "Enable section" — shown when the section is currently disabled
Note: All sections are enabled by default when created. To disable a section, click the toggle to turn it off.
5.3 Adding Sub-sections to Sections
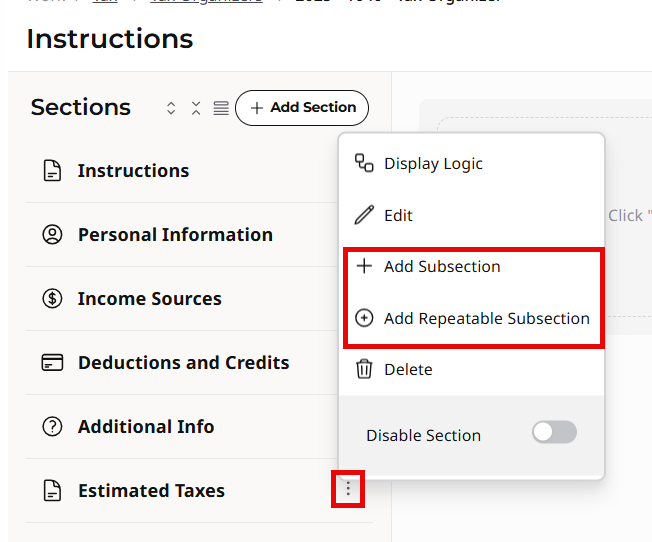
Sub-sections can be added to both default and custom sections via the three-dot (⋮) menu next to the section name in the left panel.
To add a sub-section to a custom section:
Step 1 Click the three-dot (⋮) menu next to the custom section name in the left panel.
Step 2 Select Add Subsection or Add Repeatable Subsection.
Step 3 Enter the sub-section name and click Save.
Note Display logic cannot be applied to repeatable sub-sections. If you need conditional visibility, use a standard (non-repeatable) sub-section instead.
|
Option |
Description |
|---|---|
|
Add Subsection |
Adds a static sub-section. Appears once for the client. |
|
Add Repeatable Subsection |
Adds a sub-section the client can duplicate (e.g., multiple rental properties). Client uses a + icon to add instances. |
Note Some sub-sections and categories are set as repeatable by default — identified by a + icon next to their name. Clients see the + icon to add multiple instances of these. No setup is needed for these.
Note: When you add the first question to a section, the option to add sub-sections is disabled for that section. Conversely, if a sub-section already exists, questions can only be added inside the sub-sections — not directly to the parent section. The Add Section modal also displays this as a reminder when you create a new section.
| Element | Three-dot Menu Options |
|---|---|
| Default Section | Display Logic, Add Subsection, Add Repeatable Subsection |
| Custom Section | Display Logic, Edit, Add Subsection, Add Repeatable Subsection, Delete, Disable |
| Default Subsection | Display Logic, Disable |
| Custom Subsection | Display Logic, Edit, Delete, Disable |
5.4 Applying Display Logic at the Section or Sub-section Level
Display logic can be applied at the section and sub-section level, not just on individual questions. This lets you hide an entire section or sub-section based on a client's earlier responses.
From the three-dot (⋮) menu on a section or sub-section, select Display Logic, then follow the same condition builder steps as question-level logic (see Section 7.4).
Note Parent-level logic always overrides child-level logic. If a section is hidden, all questions inside it are hidden regardless of their own logic settings.
6. Working with Categories
6.1 Category vs. Repeatable Category
Before creating a category, decide whether clients may need to add multiple instances:
Note: Display logic cannot be applied to repeatable categories. If you need a category to show or hide based on client responses, use a standard Category instead.
|
Feature |
Category |
Repeatable Category |
|---|---|---|
|
Use case |
Group related questions into a labeled block |
Client has multiple instances of the same data (e.g., multiple vehicles) |
|
Client experience |
Appears once, static |
Client sees a + icon to duplicate the entire set of questions |
|
After creation |
Cannot be converted to Repeatable |
Must be created as Repeatable from the start |
|
Example |
Vehicle Information (one vehicle) |
Vehicle Information (Vehicle 1, Vehicle 2, Vehicle 3...) |
Important Plan for repeatability before building. A category cannot be converted to a repeatable category later. When in doubt, use Repeatable Category for anything a client could have multiples of.
6.2 Creating a Category
Step 1 Inside a section or sub-section, click Add Question.
Step 2 Select Category or Repeatable Category from the drop-down.
Step 3 Enter the category name and save.
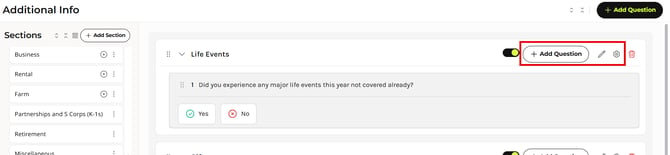
Step 4 Click Add Questions inside the category to add nested questions.
The full list of question types is available inside a category.
🆕 Category names can now be renamed at any time. Click the edit icon next to the category name in the template builder.
6.3 Enabling, Disabling, and Adding Display Logic to a Category
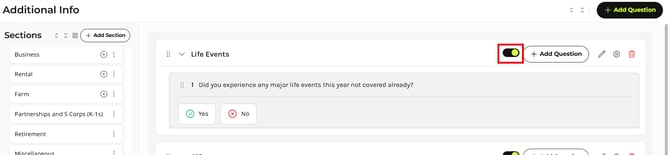
Each category has a toggle to enable or disable it. Categories are enabled by default when created. A disabled category is completely hidden from clients. To disable a category, click its toggle to turn it off. Use this to hide categories that are not relevant for your client base without removing them from the template.
Categories also support display logic. From the category settings icon, select Display Logic to configure conditions that control when the category — and all questions inside it — is shown to clients. This follows the same condition builder as question-level and section-level logic (see Section 7.4).
7. Adding and Configuring Questions
Inside any section, sub-section, or category, click the Add Question button (top-right of the question area) to add a new question.
7.1 Question Types Reference
|
Question Type |
Best Used For |
Special Options |
|---|---|---|
|
Short Answer |
Names, numbers, codes, single-line text |
Answer format: Text, Integer, Currency, %, SSN, EIN, Phone (input validation) |
|
Long Answer |
Explanations, open-ended notes |
Larger text input box for clients |
|
Multiple Choice |
Single selection from a list |
Can enable a text-explanation field on selected choices |
|
Checkboxes |
Multi-select from a list |
Can enable a text-explanation field on selected choices |
|
Date |
Deadlines, dates of sale, custom date fields |
Date picker for clients |
|
Rating |
Satisfaction or preference scoring |
5-star scale |
|
Document |
Requesting a specific document upload |
Marks the question as a document-collection item |
|
Checklist |
Acknowledgment items |
Client marks each item as Applicable or Not Applicable |
|
Category |
Grouping related questions |
Static — appears once; supports nested questions |
|
Repeatable Category |
Multiple instances of same data |
Client uses + icon to duplicate the entire question set |
|
Schedule Line |
A Line item to be to any of the Schedules |
Only applicable for Schedule type of question |
Tip For Short Answer questions, always set the Answer Format to enforce correct data entry. Use SSN for Social Security Numbers, EIN for employer IDs, and Currency for dollar amounts — this prevents clients from entering free-form text in these fields.
7.2 Configuring a Question
After adding a question, configure the following settings:
- Required or optional — controls whether the client must answer this question to complete the organizer
- Answer format — for Short Answer, select the validation type (Text, Currency, SSN, etc.)
- Attachment settings — whether clients can or must upload a document (see Section 7.3)
- Display logic — whether the question only appears when certain conditions are met (see Section 7.4)
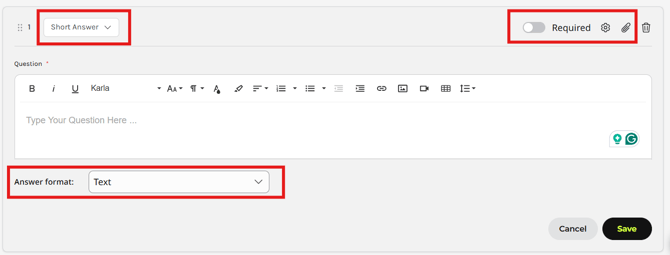
🆕 Personal Information fields — Taxpayer, Spouse — are no longer hardcoded as required. You can now mark any personal info field as optional or required using the standard question settings.
7.3 Attachment Settings
To upload an attachment to a question, click the attachment icon at the top of the question form, next to the Settings (⚙) icon. To configure attachment settings — such as disabling attachments or marking them as required — click the Settings (⚙) icon and navigate to the Attachment tab.
|
Setting |
Behavior |
|---|---|
|
Attachments enabled (default) |
Client sees an attachment upload option on this question. Firm can also upload documents for the client to download. |
|
Disable Attachment Uploads |
Attachment option is hidden entirely from the client. |
|
Mark Attachments as Required |
Client must upload a document to complete this question. Only available when attachments are enabled. |
Note Attachment settings are configured per question, not per section. Review attachment requirements for each question where document collection is important.
7.4 Configuring Display Logic
Display logic controls when a question, category, sub-section, or section is shown to the client, based on their answers to earlier questions.
Step 1 On any question, click the Settings (⚙) icon.
Step 2 Navigate to the Display Logic tab.
Step 3 Set the Condition Logic: AND (all conditions must be met) or OR (any condition must be met).
Step 4 Click Add Logic.
Step 5 Specify the source: Section → Sub-section(if applicable)→ Category (if applicable) → Question.
Step 6 Set the Rule: Answered, Not Answered, Equal To, or Not Equal To.
Step 7 Add additional conditions as needed, then click Update.
Note If you delete a question that another question's display logic depends on, Qount will show a warning prompt before proceeding. Confirming the deletion removes the display logic dependency and deletes the question.
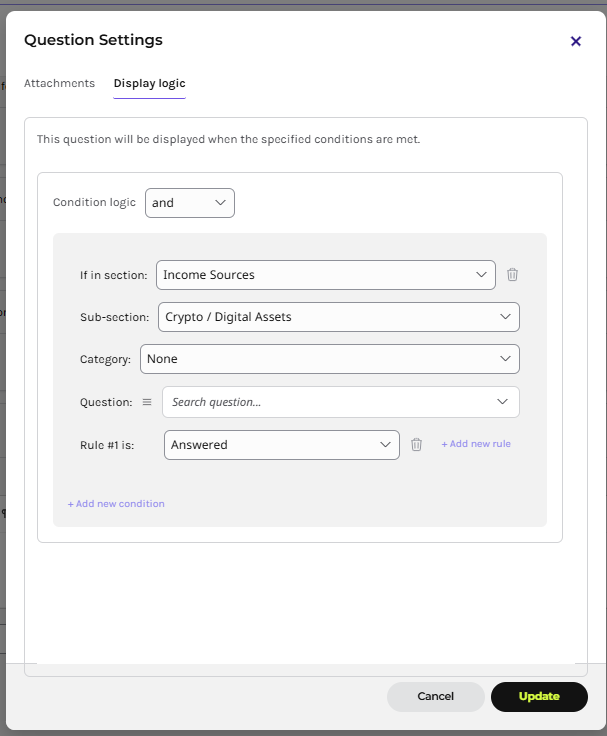
Tip Use Equal To logic on a Yes/No question to show follow-up questions only when the client answers Yes. For example: show the Foreign Income sub-section only when "Did you have foreign income?" equals Yes.
Note Display logic can only reference questions that appear earlier in the organizer — forward references are not supported. A purple dependency icon appears on any question that has display logic configured. Clicking it opens the logic configuration directly.
8. Prior-Year Data Pull
Several sections and question types automatically pull data from the prior-year organizer when a new organizer is created for a returning client. This reduces repetitive data entry for both clients and staff.
Important The template alone is not sufficient for prior-year data to appear. Prior-year files must also be printed from your tax software and uploaded to the 1Organizers folder. Refer to Tax Software Print Instructions for the required setup.
🔗 See Tax Software Print Instructions for how to print and upload prior-year organizer files for each supported tax software.
8.1 Sections That Pull Prior-Year Data Automatically
|
Section / Sub-section |
Fields Pulled |
|---|---|
|
Taxpayer Information |
First name, Last name, Date of birth, SSN, Occupation |
|
Spouse Information |
First name, Last name, Date of birth, SSN, Occupation |
|
Dependents |
All dependent details from the prior-year organizer |
|
Contact Information |
Address, City, State, ZIP, Email, Phone numbers |
|
Bank Information |
Bank name, Account type, Routing number, Account number |
8.2 Income Sub-sections — Prior-Year Question Types
Inside an income sub-section, click Add Question and select the built-in question type named after that sub-section. This automatically inserts structured prior-year questions:
|
Sub-section |
Prior-Year Question Type to Select |
|---|---|
|
Wages |
Wages (W-2 details) |
|
Bank & Brokerages |
Institutions |
|
Business |
Schedule C |
|
Rental |
Schedule E |
|
Farm |
Schedule F |
|
Partnership |
Partnerships |
|
Retirement |
Social Security (1099-SSA), Retirement/Pensions (1099-R) |
|
Miscellaneous |
1099-NEC, 1099-MISC, 1099-G, 1099-K, 1099-S |
Pulling Estates & Trusts and Itemized Deductions from prior year is coming soon.
Important Prior-year data only populates when these specific built-in question types are included in the template. Custom questions you create from scratch in these sub-sections will not pull prior-year data.
8.3 Extending Prior-Year Mapping to Custom Templates
🆕 Wages and 1099 mapping sections — previously available only in the Qount-provided template — can now be added to any custom template via the Add Questions panel.
9. Saving Your Work
Important Qount does not auto-save question changes. After adding or editing each question, click the Save button to confirm the change. If you navigate away without saving, your changes will be lost.
Use the expand (▼) and collapse (▲) icons next to each section in the left panel to keep the workspace tidy as your template grows.
10. Frequently Asked Questions
Yes. Template changes apply immediately to all client organizers built from that template, including those already sent. If a client has already submitted their organizer, they may see structural changes upon re-opening it. Plan template edits carefully and avoid structural changes once organizers are live.
Can I make a change for just one client without affecting everyone else?
No. There is no client-level override. All organizers from a template share the same structure. If you need a variation for a specific client type, duplicate the template and modify the copy.
What is the difference between a repeatable sub-section and a repeatable category?
Both allow clients to add multiple instances (e.g., Vehicle 1, Vehicle 2). A repeatable sub-section sits at the section level in the left panel and is best for major groupings. A repeatable category is nested inside a section or sub-section and is better for smaller grouped sets of questions within a sub-section.
Which sections are repeatable out of the box?
Several sub-sections and categories in the template are set as repeatable by default. These are identified by a + icon next to their name in the template builder. Clients automatically see the + icon to add multiple instances — no setup needed.
Why isn't prior-year data appearing in the client organizer?
Prior-year data only populates when the built-in question types for each sub-section are used (e.g., selecting the "Wages" question type inside the Wages sub-section). Custom questions created from scratch will not pull prior-year data. Also verify that prior-year organizer files have been printed and uploaded correctly. Refer to Tax Software Print Instructions for setup steps.
Can I reorder questions within a section?
Yes. Questions can be reordered within a section or sub-section by dragging them to the desired position.
What happens to a template I archive?
Archived templates are removed from the Active view but are not deleted. They can be restored at any time from the archived templates view.
What tax types does Qount support for templates?
Currently, Qount supports 1040 (Individual) returns. The tax type is set to 1040 by default when creating a new template.
Related Articles
🔗Tax Organizer Template Builder — Overview
🔗 Tax Organizer Settings
🔗 Tax Software Print Instructions
🔗 Tax Organizers: Draft Management & Sending
Need Help?
If you have questions or run into issues, please reach out to your Qount Help Desk.