
Introduction
In the new Qount app, the WIP experience has been refreshed with a cleaner layout and a few powerful additions like Group by and Saved Filters. The core billing logic is the same as in the old view, but the new screen makes it much easier to see what’s billable, drill into details, and act on multiple records at once.
Use WIP whenever you want to answer questions like:
-
How much unbilled time do we have for this client?
-
Which users have the most WIP this week?
-
What should we invoice now, and what should be marked as billed or added to an existing invoice?
Quick Navigation
Key actions you can take from WIP
The new WIP experience: What's different?
What's Different? (Before vs After)
End-to-End Example: From time entry to cleared WIP
What's Coming Next (Sneak Peek)
What is WIP in Qount?
WIP (Work in Progress) represents time entries that have been logged but not yet billed.
For each time entry:
-
A user logs time for a client and either a workflow/project or a bill code.
-
That time is multiplied by the user’s bill rate (global or workflow-specific).
-
The result is a WIP amount — that’s what you see summarized on the WIP screen.
The WIP screen also lets you optionally include:
-
Expenses
-
Credits
-
Retainers
These are controlled by toggle chips at the top: Include Expense, Include Credits, Include Retainer (all defaulted to “Yes”). They determine whether those amounts are factored into the totals you see.
Only unbilled time (and related unbilled items) appear in WIP. Once you:
-
Create an invoice,
-
Add the WIP to an existing invoice, or
-
Mark it as billed,
that time leaves the unbilled state and disappears from the WIP view.
How to access the WIP Screen
In the new interface:
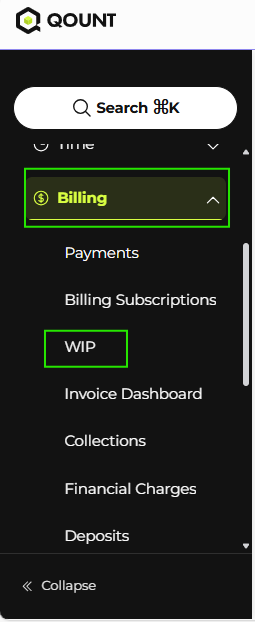
-
Go to Billing from the main navigation.
-
Click WIP.
From there you can:
-
Switch between grouping options,
-
Apply or search for Saved Filters,
-
Drill into a client or user, and
Perform all the main billing actions directly from WIP.
How WIP is generated
Before WIP can show meaningful numbers, two things have to be in place.
1. Set bill rates for users
-
Go to Manage Users.
-
Open a user’s profile.
-
Set a bill rate:
-
For all workflows (e.g., $100/hour for everything), or
-
-
-
For a specific workflow only.
-
These bill rate settings tell Qount how much to multiply each hour of time by.
Example
-
User A has a bill rate of $100/hour for all workflows.
-
They log 1 hour for Client X.
WIP for that time entry = $100.
2. Users log time (by workflow or bill code)
When users work, they log time against:
-
A client, and
-
Either a workflow/project (for example, “Payroll – January” for Client X), or
-
A Bill Code (predefined work types created at the admin level).
Once that time is saved:
-
It appears in Time, and
-
It’s automatically counted into WIP, using:
WIP amount = Hours worked × Bill rate
All such unbilled time entries (plus any included expenses/credits/retainers) are summarized in the WIP screen.
Understanding the WIP Screen
When you open Billing → WIP, you’ll see:
-
A summary view of WIP “as of today”.
-
Each row represents either:
-
A client (when grouped by clients), or
-
-
-
A user (when grouped by users).
-
At the top of the screen, you’ll typically see:
-
WIP Amount – the overall dollar amount of unbilled work, based on the current filters and toggles.
-
Toggle chips:
-
Include Expense
-
Include Credits
-
Include Retainer
-
All default to Yes and control whether those amounts are included in totals.
Below that, the table shows you aggregated WIP data such as:
-
Total hours logged (for that client or user).
-
Total value of those hours at the assigned bill rates.
Key elements you’ll use often
Group by dropdown:
- Group by Clients (default) → each row is a client, with WIP summed per client
- Group by Users (new) → each row is a user, with WIP summed per user across their clients and workflows.
Filters / Saved Filters (funnel icon & dropdown)
You can:
-
Click the funnel icon to open filters.
-
Filter by attributes like:
-
Client
-
User
-
Workflow
-
Date ranges
-
(and any other WIP filters available on the screen)
-
-
Click Save & Apply to store that combination as a Saved Filter.
Saved Filters:
-
Appear in the Saved Filters dropdown.
-
Can be searched and reused anytime, similar to filters in Workspace.
Workflow tab vs Bill Code tab
On the WIP screen, you’ll typically see:
-
A Workflow tab – for time logged against workflows/projects.
-
A Bill Code tab – for time logged using Bill Codes (pre-configured work types).
The billing actions are the same in both tabs; you’re just looking at WIP organized by the way time was recorded.
Expandable arrows
Click the arrow (▶) next to a row to drill down:
-
For clients (when grouped by clients):
-
See all workflows for that client.
-
See WIP per workflow, and the users and time entries under each.
-
-
For users (when grouped by users):
-
See all clients and workflows that have WIP.
-
Optionally bill just that user’s WIP if you want to bill per person.
-
Clickable client name
Clicking a client name opens a more detailed view, showing:
-
Workflows for that client
-
Which users recorded time
-
The WIP tied to each combination
From these views, you can drill all the way down to individual time entries.
Pro Tip
Use the arrows for a quick, structured breakdown, and click the client name when you want a more detailed “who did what” view across workflows and users.
Key actions you can take from WIP
From the WIP screen, you can perform all your main billing actions:
-
Create Invoice
-
Mark as Billed
-
Add to Invoice (with two variants: Map to Invoice and Add to Invoice)
You can do these:
-
Per time entry,
-
Per group (client or user)
1. Create Invoice (with write-up / write-down)
When you choose Create Invoice from WIP:
-
Qount opens the write-up / write-down screen.
-
You’ll see, per line (usually per user or per workflow-user combination):
-
Recorded hours
-
Original billable amount = hours × bill rate
-
-
At the top, you’ll see:
-
Expected WIP amount – total based on hours × bill rates
-
A Projected invoice amount field – where you can set the amount you actually want to bill.
-
If you adjust the Projected invoice amount:
-
Qount automatically distributes the difference (write-up or write-down) across the lines.
-
For each line, you’ll see:
-
Original billable amount (from WIP)
-
Adjusted billed amount
-
Write-up or write-down value for that line
-
You can also edit individual line amounts directly (for example, increasing just one user’s line). Qount then recalculates the write-up / write-down for that line and updates the projected invoice total accordingly.
Example
-
WIP total = $655
-
You change Projected invoice amount to $1,000
Qount:
-
Keeps the structure of the underlying time entries.
-
Increases each line proportionally (or based on your manual edits).
-
Shows line-level write-ups (e.g., +$52, +$289, etc.) so you can see exactly how you reached $1,000.
When you’re happy:
-
Click Save / Next.
-
Choose the item(s) to include on the invoice.
-
Confirm to create the invoice.
Once the invoice is created, the related WIP disappears from the WIP screen — because it’s now billed.
Pro Tip
Use write-up / write-down when you want to bill a round amount (like $1,000) instead of the exact WIP total, while still keeping accurate internal records of the underlying time and adjustments.
2. Mark as Billed
Sometimes you want to clear WIP without creating an invoice in Qount — for example, if:
- You’ve billed the client outside of Qount, or
- You’re handling that time as part of a non-standard arrangement.
In those cases, you can choose Mark as Billed:
- The selected time entries move to a billed state.
- They no longer appear on the WIP screen.
- No new invoice is created.
Pro Tip
Use Mark as Billed sparingly, and only when you’re sure the time is handled elsewhere. This keeps your WIP clean and reduces the risk of double-billing.
3. Add to Invoice (Map vs Add)
If you already have an invoice and want to attach WIP to it, use Add to Invoice.
After choosing Add to Invoice:
-
Select the target invoice.
-
Choose between:
-
Map to Invoice
-
Add to Invoice
-
Map to Invoice
-
The time entries are linked to the selected invoice.
-
The invoice total does not change.
-
Use this when the invoice amount is already correct, but you want the time detail to appear on it (for transparency or internal tracking).
Add to Invoice
-
The time entries are added and the invoice amount increases by the WIP total.
-
Use this when you still need to charge the client for that additional work.
Pro Tip
If a client asks for a single consolidated invoice use Add to Invoice to bring all relevant WIP onto that one invoice.
The new WIP experience: What's different?
The underlying billing logic remains the same between the old and new WIP screens, but the new UI adds several tools to help you work more efficiently.
1. Group by Clients (default)
By default, WIP is grouped by client.
For each client you see:
-
The total unbilled amount.
-
An arrow you can expand to see each workflow and its WIP.
From the expanded view, you can:
-
Drill down to individual time entries.
-
Take actions (Create Invoice, Mark as Billed, Add to Invoice).
This grouping will feel very familiar if you used the older version — just cleaner and easier to read.
2. Group by Users (new)
The Group by Users option is new in the WIP screen:
-
Top-level rows: users
-
Under each user: clients
-
Under each client: workflows and time entries
This makes it easy to:
-
See who is generating the most WIP.
-
Review a particular user’s billing contributions.
-
Spot workloads or billing gaps by person.
-
Optionally bill just a specific user’s WIP for a client.
There’s no firm-wide setting to force “always user” or “always client.” The system defaults to Clients, but users can switch to Users whenever they need that view.
Pro Tip
Use Group by Users during one-on-ones or team reviews to quickly check whether each team member’s time is being billed appropriately.
3. Saved Filters (new)
The Saved Filters feature replaces the old behavior where:
-
Filters had to be set manually each time, and
-
There was no way to save them.
Now you can:
-
Click the funnel icon.
-
Apply filters such as:
-
Client
-
User
-
Workflow
-
Date range
-
Other WIP-specific filters
-
-
Save this combination with a name.
Once saved, your filter:
-
Appears in the Saved Filters dropdown, and
-
Can be searched and reused with one click.
Pro Tip
Create Saved Filters for your top clients (e.g., “WIP – Top 10 Clients”) or for each partner’s book of business. It turns WIP into a one-click report instead of a repeated setup chore.
4. Drill-downs and detailed views
In the new screen, drill-downs are more structured and easier to navigate:
-
Use the arrow (▶) on a row to:
-
See workflow-level WIP totals for that client, or
-
See client/workflow breakdowns under each user (when grouped by users).
-
-
Click the client name to:
-
See a more detailed view of that client’s WIP, including:
-
Workflows
-
Users who logged time
-
Amounts per combination
-
-
These two paths give you both quick summaries and deep detail without losing context.
What's Different? (Before vs After)
WIP Experience
|
Area |
Before – Old WIP Page |
Now – New WIP Page (New Interface) |
|
Where you work |
Separate WIP screen in old app |
Billing → WIP (VIP) in the new interface |
|
Speed |
Could take 10–20 seconds to load large WIP lists |
Rebuilt for faster loading and smoother navigation |
|
View options |
Mostly summary by client, limited drill-down |
Summary + detail views by client, workflow, and user |
|
Detail by user |
When grouped by user, you only saw total hours |
See each time entry, which client, which workflow, and dollar amounts per user |
|
Group by user |
Not available |
New: Group WIP by user to see all unbilled time for each staff member and bill from there |
|
Write-ups / write-downs |
Could change amounts, but without clear breakdowns or supporting metrics |
Projected Invoice Amount with clear write-up/down totals, average hourly rate, and realization rate |
|
Level of control |
Mainly at client level |
Adjust at client level or workflow level |
|
Invoice creation |
Create invoices but with less flexibility |
Create invoices from: client view, workflow view, user view, or selected time entries |
|
UX & layout |
Older design, more clicks to understand what’s going on |
Modern layout, clearer hierarchy, and smarter summaries |
End-to-end example: from time entry to cleared WIP
Here’s how a typical flow looks in practice:
-
A user logs 5 hours of work for a client, with a bill rate of $100/hour.
-
WIP generated = $500.
On Billing → WIP, you:
-
Group by Clients.
-
Filter to that client.
-
See $500 in unbilled WIP.
-
Click the arrow to drill down and view all time entries.
-
Choose Create Invoice:
-
The write-up / write-down screen shows an expected WIP of $500.
-
You decide to bill $500 exactly (no write-up/down).
-
-
Click Next and confirm.
Result:
-
An invoice for $500 is created.
-
Back in WIP, that client’s WIP is now zero for those entries — they’ve been billed.
The same logic applies if you:
-
Use Mark as Billed instead (time disappears from WIP with no invoice), or
- Use Add to Invoice to attach and/or increase an existing invoice.
Best Practices & Tips
Check WIP regularly
Make WIP part of your daily or weekly routine so you don’t leave time unbilled.
Use Saved Filters as your “reports”
Instead of rebuilding filters each time, save them once and reuse them as if they were custom WIP reports.
Review by Users for performance & accuracy
Group by Users to quickly spot:
-
Unbilled time sitting too long.
-
Users who may be logging time but not being invoiced properly.
Use write-up / write-down intentionally
When billing above or below the strict WIP total, use the write-up / write-down screen so your internal records still reflect how you reached the invoiced amount.
What's Coming Next (Sneak Peek)
The team is already planning the next steps: using AI to make WIP and billing even smarter and introducing bulk actions.
More to come there — but for now, you can start using the new WIP experience right away in the new user interface.
That’s the new WIP experience in the Qount app: a focused place to see all your unbilled work, understand it in detail, and turn it into accurate, flexible billing with as few clicks as possible.