
This article covers everything you need to manage organizers from the Tax Organizers page — from processing tax software files, to handling draft organizers, to sending them to clients and monitoring progress.
Before you begin, make sure you have completed the following:
🔗 Step 1: How to Build a Tax Organizer Template — create and configure your template.
🔗 Step 2: Tax Organizer Settings — select tax software, set default template, configure prior-year data, document folder paths, and notifications.
🔗 Step 3:Tax Software Print Instructions — print and upload prior-year organizer files from your tax software.
Note: New to the Tax Organizer module? Make sure firm users and clients have the correct access configured. See Tax Organizer Template Builder — Overview → Who Needs Access.
If your firm has built or used any templates in the previous version of Tax Organizers in the new interface, you will need to duplicate those templates to access the new features and continue working on them in the updated version. Templates from the previous version cannot be used for sending organizers or performing any actions — they must be updated to the latest version by duplicating. The duplicated template will include all the latest functionality. Your original template remains unchanged.
Quick Links
1. The Tax Organizers Page
Navigate to Work → Tax → Tax Organizers to reach the Tax Organizers page. This lists your organizer templates by tax year. Click any template name to open it and view all client organizers within that template.

Use the Tax Year selector to filter by year. The default year shown is determined by the Organizer Template setting in Tax Organizer Settings.
🔗 To update the default year or template, see Tax Organizer Settings → Organizer Template.
Inside a Template View
Opening a template shows all client organizers for that template, with status tabs at the top showing counts for each status. The top-right corner contains two key buttons:
- Process Organizers — triggers processing of files printed to QDrive (see Section 4).
- Send — opens the send options dropdown for delivering organizers to clients.
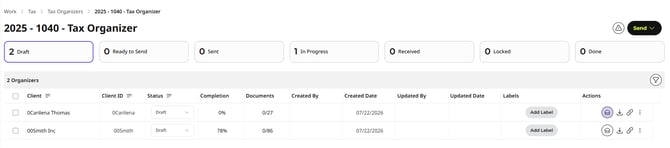
|
Column |
Description |
|---|---|
|
Client |
Client name. |
|
Client ID |
The unique client ID in Qount. |
|
Status |
Current status with an inline dropdown to change it. |
|
Completion |
Percentage of required questions answered by the client. |
|
Documents |
Required documents ratio (e.g., 2/69 = 2 of 69 required documents uploaded). |
|
Created By |
The user who created the organizer. |
|
Created Date |
Date the organizer was created. |
|
Updated By |
The last user who made a change. |
|
Updated Date |
Date of the last update. |
|
Labels |
Custom labels applied to the organizer. Labels are created and managed under Firm Management → Manage Labels → Questionnaire. They must be applied at the individual organizer level — there is no bulk label action. |
|
Actions |
Per-row action icons (see Section 7: Per-Organizer Actions). |
To create or manage labels, navigate to Firm Management → Manage Labels → Questionnaire.
Filtering Organizers
Use the Filter icon (top-right of the template view) to open the Filters panel. You can filter by:
Clients — search and select one or more clients to narrow the list.
Labels — search and select one or more labels applied to organizers.
Roles / Users — filter by the roles or users assigned to organizers. Set the Condition to Includes, then select the Role(s) and/or User(s) to filter by.
Once you've set your filters, click Save to apply them. Click Cancel to close without applying.
2. Organizer Statuses
Client organizers move through the following statuses from creation to completion. Status counts are shown on the tabs within each template view.
|
Status |
Meaning |
|---|---|
|
Draft |
Organizer has been created (via prior-year merge or manual creation) but has not yet been reviewed or sent. The default starting state. |
|
Ready to Send |
Firm has reviewed the draft and marked it as ready. Required before organizers can be automatically delivered via workflow automations. |
|
Sent |
Organizer has been delivered to the client. Client has not yet opened it. |
|
In Progress |
Client has opened the organizer and is actively filling it out. |
|
Received |
Client has submitted the completed organizer back to the firm. |
|
Locked |
Firm has approved the submission and locked it. No further client edits are allowed. |
|
Done |
Organizer process is complete. |
How Ready to Send Works
Organizers in Ready to Send status can be automatically delivered to clients through workflow automations configured in Manage Workflow. There are two automation types your firm can configure:
|
Automation Type |
How It Works |
|---|---|
|
Send Tax Organizers |
When a task is moved to the configured trigger status, Qount automatically sends the organizer to the client. |
|
Send Engagement Letter and Tax Organizer |
When a task is moved to the configured trigger status, Qount first sends an engagement letter to the client. Once the engagement letter is completed, the organizer is automatically sent. |
For automatic sending to trigger, all three of the following must be true:
- The organizer is in Ready to Send status
- Contact details are set as organizer recipients
- Email content is added to the organizer
Note: Organizers in Draft status can be sent manually at any time. However, only Ready to Send organizers are eligible for automated delivery through workflow automations.
3. Printing Organizers to QDrive
Before Qount can generate personalized client organizer drafts, you must print or export organizer files from your tax software to QDrive. QDrive acts as a virtual printer — instead of sending files to a physical printer, you direct them to a designated folder that Qount monitors.
🔗 For full step-by-step printing instructions for each supported tax software, see Tax Software Print Instructions.
File Naming Convention
Organizer files printed to QDrive must follow this naming format:
ClientID_ClientName_TaxYear_Organizer
Example: 12345_JohnSmith_2025_Organizer
Important Files that do not match this naming convention may fail to process or be placed in the Failed Organizers table. For the full naming convention details and software-specific notes, refer to Tax Software Print Instructions → Section 3.
4. Processing Organizers
After printing organizer files to QDrive, you must manually trigger processing. Qount does not process files automatically — you initiate the run from inside the Tax organizers template view.

Step 1 Navigate to Work → Tax → Tax Organizers and open your template folder.
Step 2 Click the Process Organizers button on the Tax Organizers page.
Step 3 Qount reads the files in QDrive, matches each file to a client, merges prior-year data with your default template, and generates individual client drafts.
Processing time varies based on the number of clients and file volume. There is no progress bar — drafts appear in the Tax Organizers table when ready.
Once processing completes:
- Successfully processed organizers appear in the Tax Organizers table under the Draft tab.
- Organizers that could not be processed appear in the Failed Organizers table (see Section 5).
Note Processing runs in the background. You do not need to stay on the page while it runs. Check back after a few minutes to see the results.
5. Failed Organizers

When one or more organizers fail to process, a visual indicator appears on the Tax Organizers page failed organizers icon. Failed organizers are accessible in the Failed Organizers table on the Tax Organizers page.
Why Organizers Fail
|
Failure Reason |
What It Means |
How to Fix |
|---|---|---|
|
Client Not Found |
The Client ID/Name in the file name does not match any client in Qount. Usually a naming error in the file. |
Correct the file name to match the format ClientID_ClientName_TaxYear_Organizer, then reprocess. |
|
Client Inactive |
The client exists in Qount but their account is set to inactive. |
Reactivate the client in Qount, then reprocess the organizer. |
Resolving Failed Organizers
For each failed organizer, you have two options:
- Fix and Reprocess — Correct the underlying issue (file name or client status) and click Reprocess to attempt processing again.
- Delete — Remove the failed record from the table if the organizer is no longer needed.
Tip Review the Failed Organizers table after every processing run, especially during peak season when large volumes of files are printed at once. Catching and fixing failures early prevents gaps in your client list.
6. Draft Organizers
Successfully processed organizers land in Draft status. A draft is a personalized organizer for one client, pre-populated with their prior-year data from your tax software files, structured around your default template.
Completion and Document Counts
When you open a client organizer, the Overview screen shows four summary grids — Questions, Documents, Comments, and Response Changes — followed by a section and sub-section breakdown. All counts are based on required items only.
Changing Status to Ready to Send
Before organizers can be automatically sent via workflow automations, they must be moved from Draft to Ready to Send.
Step 1 Navigate to Work → Tax → Tax Organizers → [Template Name].
Step 2 Click the Status dropdown for the client organizer.
Step 3 Select Ready to Send.
To change multiple organizers at once, use the Bulk → Modify Status action (see Section 8: Bulk Actions).
Note Draft organizers can also be sent manually without moving to Ready to Send first. However, only Ready to Send organizers are eligible for automated delivery through workflow automations. See Section 2 for automation requirements.
7. Per-Organizer Actions
Each organizer row in the list has a set of action icons. The actions available depend on the organizer's current status.
|
Action |
Icon |
Available For |
Description |
|---|---|---|---|
|
|
Email icon |
Draft through Received |
View or edit the email content for this organizer. A filled icon indicates email content has been configured; an outline icon means no email content has been set yet. |
|
Download |
Download icon |
All statuses |
Download the organizer. Two options are available: Organizer PDF Download — downloads the organizer PDF only; Include Attachments — downloads the organizer PDF along with all documents attached by the client. |
|
Secure Link |
Link icon |
All statuses |
Copy the secure link to share directly with the client outside of the standard email delivery. |
|
Send |
Send icon |
Draft, Ready to Send |
Send the organizer to the client for the first time. |
|
Resend |
Resend icon |
Sent, In Progress, Received |
Resend the organizer to the client (e.g., if the client cannot find the original email). |
|
MFA Settings |
MFA icon |
Draft through In Progress |
Enable or disable multi-factor authentication for this specific client's organizer. Overrides the firm-level default. |
|
Organizer History |
History icon |
All statuses |
View the full activity log for this organizer, including status changes, sends, and client interactions. |
8. Bulk Actions
Select multiple organizers using the checkboxes to access bulk actions. These allow you to perform operations across many organizers at once, which is especially useful during peak filing season.
|
Bulk Action |
Description |
|---|---|
|
|
Update the email content for all selected organizers in a single step. |
|
Send Organizer |
Send all selected organizers to their respective clients at once. An email compose dialog appears before sending. |
|
Modify Status |
Change the status of all selected organizers simultaneously (e.g., move all from Draft to Ready to Send). |
|
Mark K-1 as Firm Will Provide |
Marks all K-1 entries across selected client organizers as "Firm Will Provide." For individual K-1 selections, open the organizer and navigate to the Partnerships and S-Corp section. |
|
Bulk Download Organizer PDF's |
Download organizer PDFs for all selected clients. Processing takes a few minutes. When complete, you receive a notification, and the files are available under Profile → Downloads in the top navigation. |
|
Delete |
Permanently delete all selected organizers. A confirmation dialog appears before deletion. |
K-1: Marking as Firm Will Provide
When a K-1 is marked as "Firm Will Provide" — either via bulk action or at the individual client organizer level by selecting Yes to "Firm will provide" — the following happens automatically:
- "Still applicable" is disabled for that K-1
- Actions such as attachments and comments are disabled on that K-1 entry
- A tooltip appears on the disabled actions: "No action needed, firm will provide these details"
Use this when your firm already has all the required data for a specific K-1 and does not need the client to provide it.
9. Sending Organizers to Clients
Organizers are delivered to clients through the Client Portal. When sent, clients receive an email with a secure link to access and complete their organizer.
Secure Link & MFA
When an organizer is sent, Secure Link access is enabled by default. Clients can open, complete, and submit their organizer via the secure link in the email without needing to log into the full Client Portal.
MFA (Multi-Factor Authentication) is also enabled by default when Secure Link is active, adding an extra layer of security.
|
Setting |
Scope |
How to Change |
|---|---|---|
|
Secure Link (default on) |
Firm-wide default |
Tax Organizer Settings → Additional Settings → Secure Link Settings |
|
MFA (default on) |
Firm-wide default |
Tax Organizer Settings → Additional Settings → Secure Link Settings |
|
Secure Link (per organizer) |
Individual override |
MFA Settings icon on the organizer row (available Draft through In Progress) |
|
MFA (per organizer) |
Individual override |
MFA Settings icon on the organizer row (available Draft through In Progress) |
Important If Secure Link is disabled for a client, that client must log into the Client Portal to complete and submit their organizer.
🔗 To update firm-wide Secure Link and MFA defaults, see Tax Organizer Settings → Additional Settings → Secure Link Settings.
Individual Send (With Prior-Year Data)
For organizers in Draft or Ready to Send status that contain merged prior-year data:
Step 1: Navigate to Work → Tax → Tax Organizers → [Template Name].
Step 2 Locate the client organizer and click the three-dot menu (⋮) → Send.
Step 3 Review the pre-filled organizer, branding, client, and contact details in the Send dialog.
Branding is configured under Firm Management. To set up or update your firm's branding, refer to Firm Management settings.
Step 4 Compose your email, then click Send to deliver immediately or Save as Draft to send later.
Bulk Send (With Prior-Year Data)
Step 1 Navigate to Work → Tax → Tax Organizers → [Template Name].
Step 2 Select multiple client organizers using the checkboxes.
Step 3 Click Send Organizer in the bulk action bar.
Step 4 Compose the email in the dialog and click Send.
10. Sending Without Prior-Year Data
Use this option for new clients or when you do not have prior-year data to merge. These organizers are blank templates sent directly to clients without any pre-populated information.
Individual Send (No Prior-Year Data)
Step 1 Navigate to Work → Tax → Tax Organizers.
Step 2 Click the Send button in the top-right corner.
Step 3 Select Send Organizer (No PY) from the dropdown.
Step 4 In the Send Organizer dialog, select the Organizer template, Branding, Client, and Contact.
Branding is configured under Firm Management.
Step 5 Toggle Display Organizer in Client Portal and Secure Link settings as needed.
Step 6 Click Next, compose your email, then click Send.
Bulk Send (No Prior-Year Data)
Step 1 Click the Send button and select Bulk Send Organizers (No PY).
Step 2 Select Clients: Check the clients to include. Click Next.
Step 3 Select Contacts: Review and filter contacts. Click Next.
Step 4 Select Organizer: Choose the template and branding. Click Next.
Step 5 Compose Email: Enter the subject and content. Click Send Organizer.
11. Reminders
If a client has not started or submitted their organizer, you can set automated follow-up reminders. Reminders are configured per organizer and are available for organizers in Ready to Send, Sent, and In Progress statuses.
The firm-level default reminder frequency is set in Tax Organizer Settings → Additional Settings → Reminder Frequency. Individual reminders configured here override the firm default for that organizer.
🔗 To configure the firm-wide default reminder frequency, see Tax Organizer Settings → Additional Settings → Reminder Frequency.
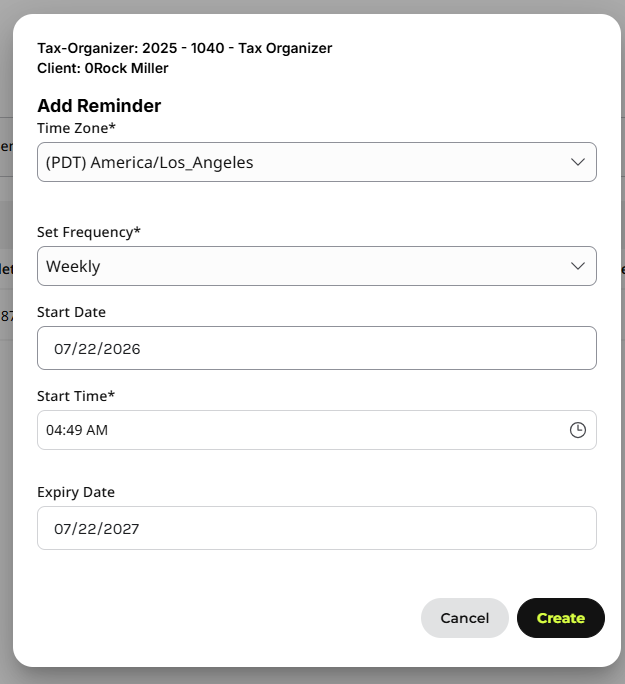
Step 1 Locate the organizer in the list.
Step 2 Click the three-dot menu (⋮) and select Set Reminder.
Step 3 Configure: Time Zone, Set Frequency, Start Date, Expiry Date, and Start Time.
Step 4 Click Create.
A bell icon appears on the organizer row once a reminder is configured. From the bell icon you can:
- View scheduled (upcoming) reminders and skip individual ones
- View sent reminder history
- Edit or delete the reminder configuration
12. Monitoring Client Progress
Once organizers are sent, track client activity from the Tax Organizers page.
Screenshot: In Progress tab — client list with completion indicators
- In Progress tab — clients who have opened the organizer and are actively working on it.
- Received tab — clients who have submitted their completed organizer.
Organizer Overview Screen
Click on any client record to open their organizer. The Overview screen is the central hub for monitoring and reviewing that client's organizer.
|
Card |
What It Shows |
|---|---|
|
Questions |
Total required questions, how many are complete, and how many are not yet started. Optional questions are not included in this count. |
|
Documents |
Expected, attached, and missing document counts. Clicking Documents opens the Document Review page, where all uploaded and missing documents are listed per section. |
|
Comments |
A list of all questions that have client or firm comments attached. Clicking Comments opens the full comments view to review each one in context. |
|
Response Changes |
The number of responses the client has changed compared to last year. Applies to the Personal Information and Income Sources sections — shows where a returning client has updated answers pre-filled from their prior-year organizer. |
Note: Completion and document counts reflect required items only. Optional questions and documents are not included in these totals.
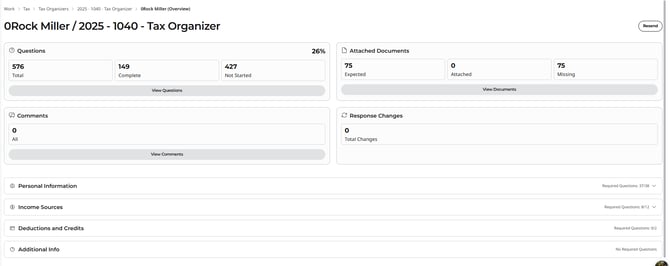
The top of the screen shows four summary grids, followed by a full section and sub-section breakdown:
Prior-Year Labels and Yellow Highlighting
For fields in the Personal Information section that were pre-filled from the prior-year organizer, a PY label appears next to the answer. This helps the firm and client see at a glance which information was carried forward from last year.
When a client updates a pre-filled answer, that field is highlighted in yellow — making it easy for the firm to spot which responses have changed since the prior year.
Note PY labels and yellow highlighting apply to both the Personal Information and Income Sources sections. They mark any field that was pre-filled from prior-year data and has since been edited by the client.

Downloaded PDF and Yellow Highlighting
When you download a completed organizer as a PDF (via the Download icon on the organizer row), two types of highlighting appear:
Yellow highlight — fields where the client updated a prior-year pre-filled value.
Blue highlight — fields where the client answered Yes to a question.
This makes it easy to review both what changed from prior year and where clients have confirmed Yes answers when processing the return.
Tip Yellow highlighting in the PDF matches what you see in the organizer. Blue highlighting is PDF-only — it does not appear in the organizer view.
Changing Organizer Status After Submission
Once a client submits their organizer, you can advance its status from Received to Locked or Done:
Step 1 Navigate to the Received tab.
Step 2 Click on the client to open their organizer.
Step 3 Click the Status dropdown and select the new status (Locked or Done).
🔗 For a client's perspective on completing the questionnaire, see Completing Your Tax Questionnaire — Client Guide.
13. Frequently Asked Questions
What is the correct file naming format when printing to QDrive?
Files must follow this format: ClientID_ClientName_TaxYear_Organizer. For example: 12345_JohnSmith_2025_Organizer. Files that do not follow this format may fail to process or be placed in the Failed Organizers table. For full details, refer to Tax Software Print Instructions → Section 3.
Why are some organizers in the Failed Organizers table?
Organizers fail for two reasons: (1) Client Not Found — the Client ID/Name in the file name does not match any client in Qount; or (2) Client Inactive — the client exists but their account is inactive. Fix the underlying issue and click Reprocess, or delete the failed record.
Do I need to click Process Organizers every time I print files to QDrive?
Yes. Qount does not automatically process new files in QDrive. After printing organizer files, you must click Process Organizers on the Tax Organizers page to trigger processing.
What is the difference between Draft and Ready to Send?
Draft is the initial state when an organizer is created. Ready to Send means a firm staff member has reviewed the draft and confirmed it is ready for the client. Only Ready to Send organizers can be delivered via automated workflow sends. Both Draft and Ready to Send organizers can be sent manually.
Can I send an organizer without moving it to Ready to Send first?
Yes. Draft organizers can be sent manually at any time. However, they will not be included in automated sends through workflow automations — that requires Ready to Send status, contact details set as recipients, and email content configured.
Where can I find bulk downloads after requesting them?
Bulk downloads take a few minutes to prepare. When ready, you receive a notification and can access the files under Profile → Downloads in the top navigation bar.
How do I mark K-1s as Firm Will Provide for all clients?
Use the bulk action "Mark K-1 as Firm Will Provide" when multiple organizers are selected. This marks all K-1 entries as Firm Will Provide, disables attachment and comment actions on those entries, and shows a tooltip to the client indicating the firm will provide the details. To mark only specific K-1s for a single client, open that client's organizer and navigate to the Partnerships / S-Corp section.
What do the filled vs. outline email icons mean on organizer rows?
A filled email icon means email content has been configured for that organizer. An outline (empty) icon means no email content has been set yet. The email icon is available for organizers from Draft through Received status.
Do completion and document counts include optional questions?
No. The Questions, Documents, Comments, and Response Changes grids on the Overview screen reflect required items only. Optional questions and documents are not included. Response Changes applies to the Personal Information section only.
Can labels be applied in bulk across multiple organizers?
No. Labels must be applied at the individual client organizer level. There is no bulk label action. To create or manage labels, navigate to Firm Management → Questionnaire → Manage Labels.
Related Articles
🔗 Tax Organizer Template Builder — Overview
🔗 How to Build a Tax Organizer Template
🔗 Tax Software Print Instructions
Need Help?
If you have questions or run into issues, please reach out to your Qount Help Desk.